Enterprise Library Catalog Help
Welcome to the Enterprise Library Catalog Help section. Enterprise includes a variety of features not available in the Classic Catalog. Some of those features include the ability to text book information to your mobile phone, download 3M Cloud Library eBooks, easy access to new book lists, and more.
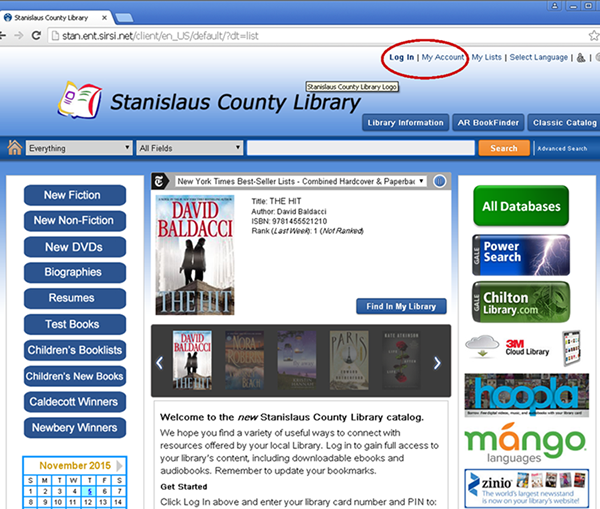
Navigating through Enterprise
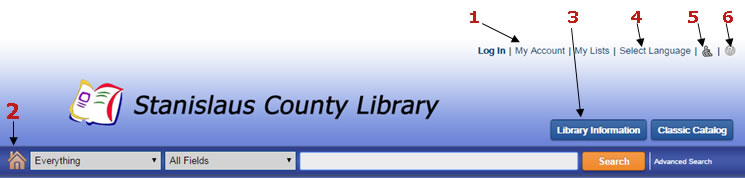
You can find navigation links in the upper-right corner of the header (1). Click one of these links at any time to log in, go to the My Account page, or go to the My Lists page. You can also click the Home icon (2) to go to the library catalog Home page.
Library Information
You can click the Library Information link (3) to find information about the library, such as location (address), phone number, open hours, etc.
Selecting a language
You can select the interface display language from the Language drop-down (4).
Once you log in, the language you select as your default language in the My Account preferences will become the interface display language automatically.
Keyboard Navigation
The standard library catalog interface is made to be accessed primarily with a mouse. However, if you are more comfortable using the keyboard, or use a screen reader, you can click here (5) to change to an interface that better accommodates that.
Enterprise Help
Additional help is available by selecting the Help icon in the upper right corner (6).
Viewing Home page content
The library catalog Home page allows you access to any content the library has set up, such as library announcements, quick access to book lists, links to websites, and more.
Books and more
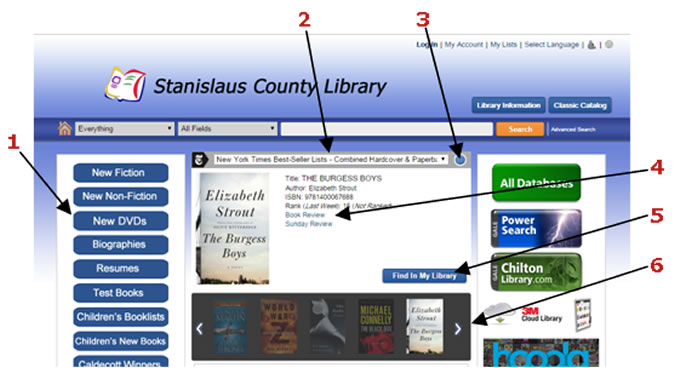
The buttons (1) on the left side of the screen are for quick access to specific materials, such as new fiction, new DVDs, biographies, etc. Select the button for the list you would like to see and it will bring up the catalog search for that selection.
Using book lists
The library displays themed lists of titles that you may find interesting to browse. These book lists come from the New York Times and USA Today reviews. To view them, select a list from the drop-down (2), and the titles in the list will slowly cycle in the display like a slideshow. To pause the slideshow, click the Pause button (3). Click on any title in the list to bring it up in the display. Use the navigation arrows in the slideshow display (6) to move through the list.
Any title you select will display information, like author, publication date, ISBN, etc. For some titles, you can click links to more information, such as a book review or an excerpt (4). You can also click the Find in My Library button (5) to search for the title in your library.
Additional resources
The buttons on the right side of the window link to our various electronic resources, such as databases, eBooks, digital magazines, downloadable audio, movies, music, and more.

Searching with limits
Use the Limits drop-down (1) to limit your search to a specific location or database (like the Gale Virtual Reference Library, audiobooks, or DVDs only, for example), or search "Everything."
Searching by field
Select a field from the Fields drop-down (2) to search within a specific field (for example, Title, Author, or Subject), or search from "All Fields."
Using advanced search
If you want more search options to help you find exactly what you're looking for, click the Advanced Search option (3) to go to the Advanced Search page.
With Advanced Searching, you can search exact phrases (4) or exclude terms from your search (5). For example, if you wanted to do a search on potters but did not want results for "Harry Potter," you could search the term "potter" and enter "Harry" in the unwanted terms box.
You can also apply any combination of limits on your search with Additional limits (6), including format type, language, location, fields, availability, and targets.
Once you have set up your search with the terms and limits you want, click the Advanced Search (7) button to get your search results.
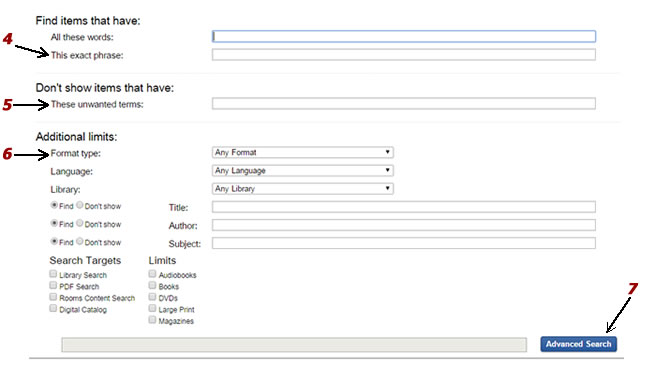
Note: While there are many options to limit your search, there is the likelihood that selecting too many limits will not return any search results.
Working with search results
View options
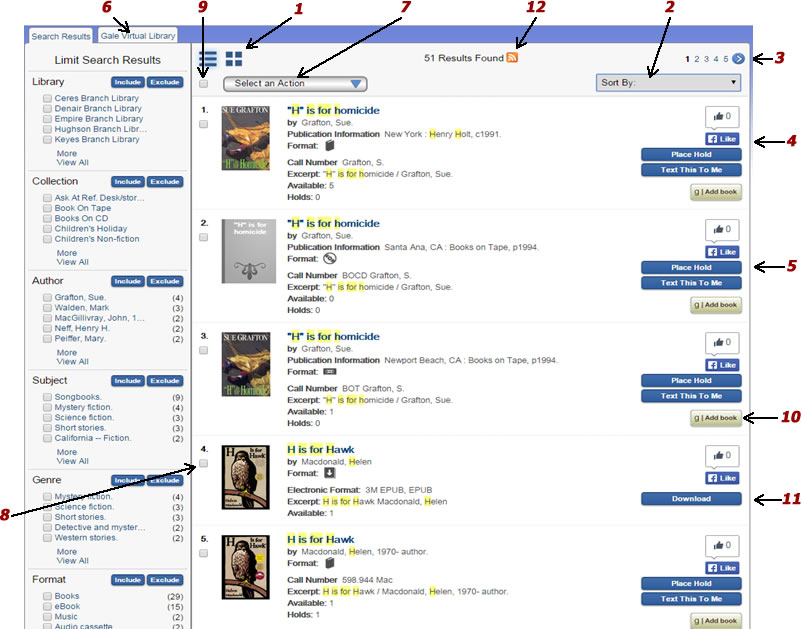
There are two different view options for your search results: List view and Grid view. Click any of these icons to change the view (1).
Sorting search results
After you have received the results of a search, you can sort the results by publication date (ascending or descending), title, or author (2). The most relevant results are then sorted by that option.
Format Types

Paging
Click the Previous and Next icons (3) to move forward and backward through pages of search results.
Using the Facebook “Like” button
If you're a Facebook user, click the Facebook "Like" button (4) to "like" an item in your search results on your Facebook profile. If you are not already logged in to Facebook when you "like" an item, a window will appear and prompt you to log in to Facebook.
Placing a hold
Items in your search results that are holdable at your library will have a Place Hold button (5) that you can click to put the item on hold. (For more information, see Placing holds.)
Note: You can also place a hold on an item by using the Select An Action menu (see Using the Select an Action drop-down menu).
Viewing results from databases

The library has a subscription to Gale Virtual Reference Library. To see search results from this database, click the Gale Virtual Library tab (6). To go back to the library's search results, click the Search Results tab.
Selecting an action
From the Select An Action drop-down menu (7), you can place holds on items, add items to your My Lists, and email or print item information. Select the items you want from your search results page by selecting the item check box(es) (8), or use the Select All check box (9) to select all items on the page. Then select the action you want to take from the Select An Action menu. (For details, see Using the Select an Action drop-down menu.)
Goodreads button
You can quickly access reviews and other information on a title by clicking the Add book (10) button. This is also good site to use for finding additional recommendations based on the title selected.
Downloading eBooks
Some of your search results may return eBooks. You can easily download them from your search results by clicking the Download button (11).
A window will appear and ask you to select an eBook reader or format. Select the reader or format you want, and the eBook will begin to download.
Saving searches as RSS feeds
If you use RSS, you can click the RSS icon (12) to save any of your searches as an RSS feed. This way, you can see updated results of your specified searches through your RSS reader. To take advantage of RSS feeds, you must have an RSS enabled browser or an RSS reader.
Limiting Search Results
Using the Show Only Available option
Click the Show Only Available button (1) to limit your search results to only items that are available for checkout.
Using limits
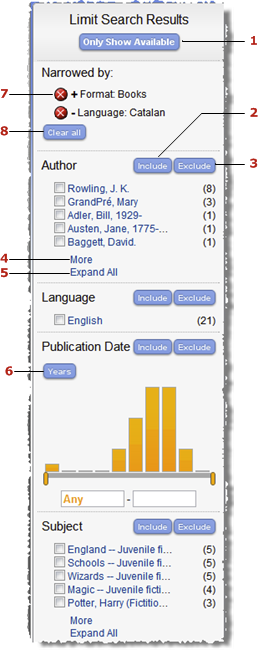
Limits are organized by fields (like Author, Format, Language, Subject, etc.). You can use limits in one of the following ways:
- Click on a limit. By clicking a single limit, you will narrow your search results to meet that limit. For example, if you click on "Books," your search results will only include items that are books.
- Select a limit or multiple limits to include in or exclude from your search results. You can select one or multiple limits within a single field by clicking the check box next to the limit(s).
- If you want to include limits in your search results, click the Include button (2). For example, if you select to include Books and DVDs, your search results will only include books or DVDs.
If you want to exclude limits from your search results, click the Exclude button (3). For example, if you select to exclude Books and DVDs, your search results will include everything but books and DVDs.
Use the More and Fewer options (4) to expose or hide limits within a field incrementally. You can also use the Expand All option (5) to open all of the limits in a separate window.
Using the Publication Date limit options
The Publication Date limit has two views: Graph, and Date. You can toggle between the two (6). The Date view works just like any other limit. The Graph view, however, has some other options:
- Use the sliders to create a date range (for example, 1971-1990). Then select whether you want to include or exclude that date range in your search results.
- Enter a date range in the text box (for example, "1971" - "1990"). If you want the date range to have no end (up to the current time), leave the second text box blank (for example, "1971" - ). Likewise, if you want the date range to go back as far as it can go, leave the first text box blank (for example, - "1971"). Select whether you want to include or exclude that date range in your search results.
Removing limits
Any limits you have applied will appear in the "Narrowed by" section. Limits you have included in search results will have a plus (+) sign; limits you have excluded will have a minus (–) sign.
Click the Delete button (7) to remove an individual limit, or remove all limits by clicking the Clear all button (8).
Viewing the details of an item
Detail display
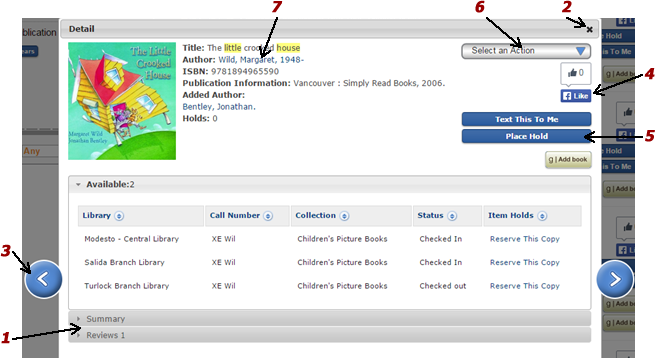
When you click on a search result title or image, a new window displays details for that item.
In the catalog data, you might see links (an author's name, for example) (7) that you can click to begin a new search for that link's content.
The different sections (1) contain information about item availability, item summaries, reviews, excerpts, etc. Click on the section you want to open and scroll down to view its content. In the catalog data, use the sort icon to sort items. Click once to sort ascending. Click again to sort descending.
To close the item detail view, click the Close button (2), or click anywhere outside the detail display window.
Paging
Click the Next and Previous buttons (3) to view the detail page of the next or previous item. The order of the items is the same as it is on the search results page.
Using the Facebook “Like” button
If you're a Facebook user, click the Facebook "Like" button (4) to "like" the item on your Facebook profile. If you are not already logged in to Facebook when you "like" an item, a window will appear and prompt you to log in to Facebook.
Placing a hold
Items that are available for checkout will have a Place Hold button (5) that you can click to put the item on hold. (For more information, see Placing holds)
Note: You can also place a hold on an item by using the Select An Action menu (6).
Selecting an action
From the Select An Action drop-down menu (6), you can place a hold on the item, add the item to My Lists, and email or print item information. (For more information, see Using the Select an Action drop-down menu)
Downloading eBooks
If the item is an eBook, you can download it by clicking the Download button, which would be listed with the other buttons.
A window will appear and ask you to select an eBook format. Select the format you want, and the eBook will begin to download.
Using My Account
My Account lets you view your checkouts, holds, and any fines you may have. You can also view your personal information, change your PIN, and set up your preferences.
Go to My Account page by clicking My Account from the upper-right corner of the header. If you are not already logged in, the system will prompt you to log in before you can access the My Account page.
Getting around in My Account
There are four My Account tabs: Personal Information, Checkouts, Holds, and Fines. Click on a tab to open it up.
Understanding the summary box
The summary box (1) gives you a quick view of the number of items you have currently checked out, the number of items you have on hold, and the amount of fines you owe your library. You can click a heading (2) (for example, "Checkouts") to open the corresponding tab.
The summary box also shows your user status. Some statuses prevent you from performing certain actions (for example, if you have unpaid fines, you may have a status that prevents you from renewing items you have checked out). If you have questions about your status, talk to a librarian at your library.
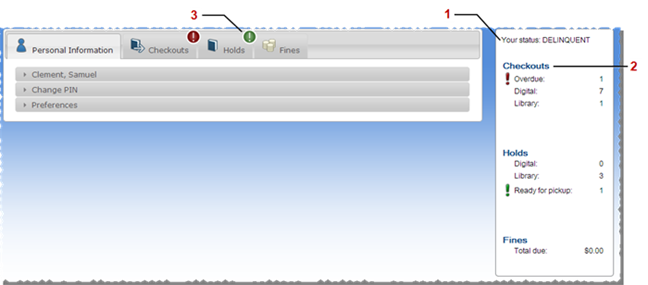
Alert icons
Alert icons will appear in My Account when a new action is available to you. For example, if you have a hold that has arrived and is ready for you to pick up, you will see an alert icon on your Holds tab and in your summary box next to the Holds heading (3). Alert icons will appear when:
- You have overdue checkouts
- You have holds that are ready for you to pick up
- You have any new or unpaid fines
Personal Information
The Personal Information tab has three sections: User information (your name will appear as the heading), Change PIN, and Preferences.
User information
The User information section displays your personal information. If you see something that is inaccurate or outdated, please talk to staff at your library.
Change PIN
Change PIN lets you designate a new Personal Identification Number or password for your library account.
Important: If you have forgotten your PIN, contact your library for instruction on how you can be assigned a new PIN.
Go to the Change Pin section to change your login PIN.
Note: The PIN must be 4 characters in length.
Preferences
Set up your personal preferences in the Preferences section.- Default Language lets you select which language you want the system to use when you log in.
- Default My Account Tab lets you select which tab (Personal Information, Checkouts, Holds, or Fines) opens when you access the My Account page.
- Default Checkouts View lets you specify whether the Checkouts tab displays your digital checkouts or library checkouts when you first open the tab.
- Default Holds View lets you specify whether the Holds tab displays your digital holds or library holds when you first open the tab.
- Preferred List lets you select a default My List. When you add a title to your lists, the program adds it to the default list. If you select "no default list", the program prompts you to select a list. You can create a list to use as your preferred list in the My Lists page (see Adding/Deleting lists).
Checkouts
My Current Checkouts
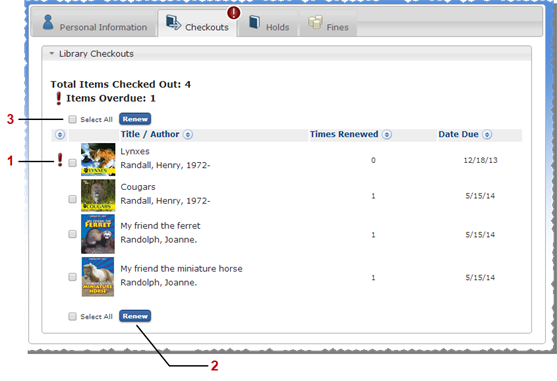
The My Current Checkouts section displays the items that you have currently checked out. If you have any items that are overdue, they will appear at the top of the list with the alert icon (1).
You can click on the title or image of any item to view its detail page.
If you want to renew items, select the items you want to renew (or select them all by using the Select All check box (2)) and then click the Renew button (3).
Use the sort icon to sort items. Click once to sort ascending. Click again to sort descending.
Holds
If you have any holds that are available for pickup, an alert icon will appear in this tab.
You can view all your holds in the My Holds section. Any holds that have arrived and are now available for you to pick up will appear at the top of the list with the alert icon.
You can click on the title or image of any item to view its detail page.
From this section, you can also cancel or suspend a hold. To perform one of these actions, select the items you want (or select them all by using the Select All check box and then click one of these buttons:
- Cancel Hold(s). After you click this button, a window will open to confirm the cancellation. Click Yes to cancel the hold or No to go back.
- Suspend Hold(s). When you click this button, a window will open with a calendar you can use to select the start date of the suspension and the end date of the suspension. Click Suspend to suspend the hold or Cancel to go back.
- Cancel Hold Suspension. When you click this button, a window will open to confirm the cancellation. Click Yes to cancel the hold suspension or No to go back.
Use the sort icon to sort items. Click once to sort ascending. Click again to sort descending.
Fines
The Fines tab has two sections: Current Fines and Payment History. If you have any new or unpaid fines, an alert icon will appear in this tab. You can pay fines in person at your library.
Current Fines
Go to the Current Fines section to view any new or unpaid fines. You can pay fines in person at your library.
You can click on the title or image of any item to view its detail page.
Use the sort icon to sort items. Click once to sort ascending. Click again to sort descending.
Payment History
You can view a history of any payments you have made to fines in the Payment History section. This section will display the dates you made payments and the amount that was paid.
Using My Lists
When you find items in Searching that you want to keep and organize, you can save them in your My Lists. You can create and customize your lists, and you can print or email your lists. From My Lists, you can also place holds on items.
Adding items to My Lists
You can add items to your My Lists by using the "Select An Action" drop-down from either a search results page or an item's detail display.
If you are logged in to the system, you will be prompted to select which of your lists you want to save items to.
If you are not already logged in to the system, any items you add to My Lists will be sent to a "Temporary List." To access your custom lists, you will need to first log in.
Using your Temporary List
If you are logged in to the system, you can move items into other lists, or you can save the entire list. In essence, you will be creating a new list out of the items in your Temporary List.
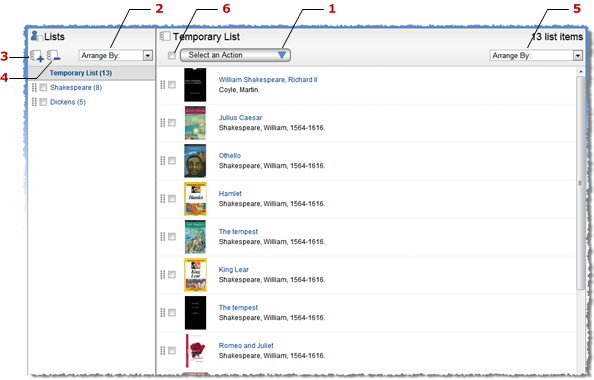
To save your Temporary List, select Save Temporary List from the Select An Action menu (1). A window will open and ask you to name the new list. Enter the name and click Save to save the list or Cancel to go back. If you log out without saving the list, the Temporary List will be cleared.
If you are not logged in, the list of titles will be cleared after your session has expired (about 10 minutes with no activity in the browser). You can log in after you have placed items in your Temporary List to move them to one of your saved lists.
Viewing and arranging My Lists
Your Temporary List and your saved lists are listed in the left-side window under the "Lists" heading.
To view a list, click on it. It will open in the main window.
To arrange your saved lists, do one of the following:
- Use the (||) icon to drag and drop your lists in the order you want them to appear.
- Use the Arrange By drop down (2) to arrange your lists alphabetically (ascending or descending), or by the time they were created (most recent first or oldest first).
Adding/Deleting lists
To create a new list, click the Add List button (3). A window will open and prompt you to name your new list. Enter the name and click Create to create the new list or Cancel to go back.
To delete lists, select the lists you want to remove and then click the Delete Lists button (4).
Viewing and arranging items in a list
You can click on the title or image of any item to view its detail page.
To arrange items in a list, do one of the following:
- Use the (||) icon to drag and drop your lists in the order you want them to appear.
- Use the Arrange By drop down (5) to arrange the items in your list alphabetically (ascending or descending), or by the time they were added to the list (most recent first or oldest first).
Selecting an action
First, select the items you want to do an action on, or use the Select All check box (6) to select all items on the page. Then choose the action you want to take from the Select An Action menu (1). (For details, see Using the Select an Action drop-down menu.)
Placing a Hold
Many items in your library are available for holds.
If you are not already logged in when you try to place a hold, the system will prompt you to log in.
A window will appear for you to specify the library where you want to pick up the item when it arrives. Once you have selected the pickup library, click Place Hold. The system will tell you if the hold was successfully placed or not.
Once you have placed a hold on an item, you will be able to see it in My Account under the Holds tab.
Renewing Materials
There are two ways to access the "My Account" or "Renew" features of the library catalog. You can log into your account directly from the library's home page or you can login from the library catalog. The steps for each method follow.
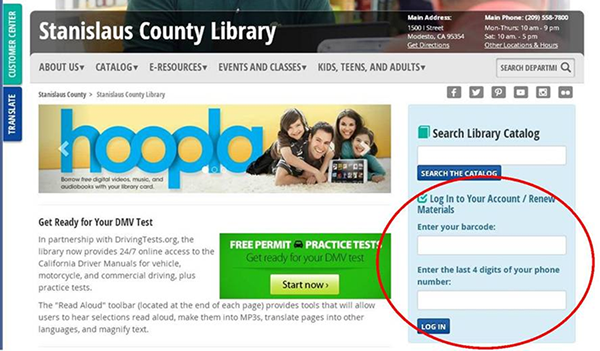
From the library website home page, you can log into your account and renew materials using the login in the blue box located under the address and hours on the right side. The account login is just below the Search Library Catalog section. The "My Account" page will display. Te renew, select the “checkouts” tab, select the item(s) you wish to renew and then click “renew.”
From the library catalog, you can log in to your account using “My Account” at the top of the page from the catalog view. Once logged in, select the “checkouts” tab, select the item(s) you wish to renew and then click “renew.”
Using the Select an Action drop-down menu
The "Select an Action" menu is found on the search results page, on an item's detail display, and in My Lists. The following options are available:
- Place Hold: This option lets you place a hold on selected items (see Placing holds).
- Add to My Lists: This option lets you save selected items to a list. If you are not already logged in, items will automatically be sent to a temporary list (for details, see Using My Lists). You can see this temporary list by going to the My Lists page.
- If you are logged in, a window will appear and ask you to specify which of your saved lists you want to add the item(s) to. Select the list you want and click Add.
- The system will tell you when items were added successfully, and then you can see them when you go to the My Lists page.
- Note: The "Add to My Lists" option will not appear when you are on the My Lists page.
- Email: This option lets you email item information. A window will appear where you can enter the email address where the item(s) information will be sent. If you want to send the email in plain text format instead of HTML, select the option. Click Send Email when you have finished.
Print: This option lets you print item information. The item(s) information will display on a new page in print format. Use your browser's print option to send the information to a printer.
The following options will also appear in the "Select an Action" menu on the My Lists page:
- Delete Selected: This option lets you remove items from a list. A window will appear to confirm that you want to remove the item(s) from your list. Click Delete to remove the item(s) or Cancel to go back.
- Move: This option lets you move items from one list to another. A window will appear for you to select which list you want to move the item(s) to. Click Move to move the item(s) or Cancel to go back.
- Copy: This option lets you copy items from one list to another. A window will appear for you to select which list you want to copy the item(s) to. Click Copy to move the item(s) or Cancel to go back.